Sunday, 28 June 2015

Aafiyah Ramadan Competition

Hello, all! I have recently been working with the good people at Aafiyah and have created some tasty and simple recipes using their convenient frozen poultry range. Aafiyah are currently running a competition during Ramadan where there is a great hamper of goodies up for grabs. 

All you have to do is try out one of the recipes on the website and upload an image of your creation. You could try out my tandoori chicken recipe, or chicken and sausage bake or some quick spicy wings. Not only are they quick and easy dishes for iftar, but by entering the competition you have a chance to win some free goodies. Win win situation all around I say. It would be great for one of my readers to win the competition, so do give it a go guys!


Sumac Lamb Chops


Greetings readers! I hope you have all been enjoying the weekend, and that Ramadan is going well for all who are observing it. I can't believe we are already a third of a way through. The weather has been hot with a capital H recently in London, but alhamdulillah fasting has been going well so far. The day does move a lot faster though when I am kept busy with teaching. Just this Sunday afternoon for instance, I actually out of my own free will decided to do some cleaning as I felt I had a little too much time on my hands. And as those who know me personally would agree, it takes a lot for me to be enthusiastic about cleaning...

If you have been keeping up with my instagram feed, I have been posting daily pictures of my iftar meals with my family. I have been endevaouring this Ramadan to try and eat as best as I can and not gorge on traditional fried foods like samosas and pakoras. So far I think I have been doing pretty well and have been incorporating lots of veggies, leafy greens and fruits. I also like to go for simple, minimal fuss recipes where I can just leave something to simmer away slowly on the stove or bake in the oven without me being stuck in the kitchen for ages. These sumac lamb chops would be an ideal type of dish for iftar, as you can just leave it to cook away in the oven whilst you attend to other duties. As they are baked rather than fried, they are a lot easier on the stomach, and if you have some meat-loving males in your families, this is sure to satiate their appetite after a long day of fasting!


I loooove sumac, as you might have already surmised from my Sumac roast chicken post, and this dried Middle Eastern herb gives a subtle tang to the lamb chops. Also, in combination with the yoghurt, the marinade turns a pretty cute pink colour, although it is a little reminiscent of tubby custard...

As you marinade the chops the night before, all you have to do on the day is whack it in the oven. Afterwards, you can choose to finish off the chops either in the grill or on a griddle pan for some slight charring. The longer you marinade the chops, the deeper the flavour will be, however if you are running short on time you can always just marinade it on the morning of cooking. Serve the chops with salad and roasted veggies for a light meal, or some quinoa or rice for a bit more substance.


Saturday, 20 June 2015

North African Style Chicken Stew


I've been on a bit of a Middle Eastern/North African mood with my cooking recently. After my mujadarra recipe, I have got a North African style chicken stew for you guys today. The ingredients used are inspired by the Berber tagines dishes that you might find in Morocco, however I don't own a tagine so I'm not sure how authentically Moroccan this recipe really is. 

I decided to add in some vegetables I had in my fridge like broccoli, and instead of the traditional couscous, I decided to make the dish a bit lighter and serve the stew over quinoa instead. However, you could just as easily serve it with some bread or rice if you prefer.

I used chicken thighs from Aafiyah's frozen range for this recipe. I braised the chicken thighs separately first before adding it to the pot with all of the vegetables. You can pretty much adapt it with whatever vegetables you have on hand at home, so it's a great simple dish that you can quickly whip up for dinner or iftar. 


Mujaddara (Rice with lentils)


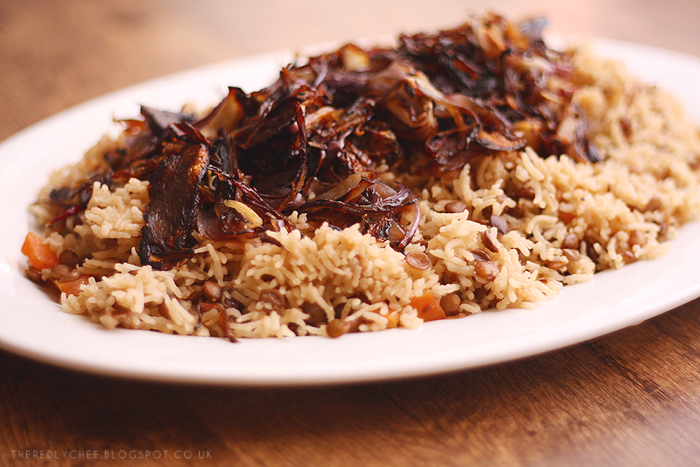
Belated Ramadan Mubarak, readers! I can't believe we're already into the 3rd day already considering the period of fasting is quite long this year. I've got my interpretation of the Middle Eastern dish, mjddara/mujaddara to share with you today which would make a lovely addition to the dinner table for iftar.

Made with lentils and rice, this is apparently known as a peasant dish, as it is a cheap and filling dish with no meat. However, you really don't miss the meat and I could easily eat plates of this rice all on its own.

Being typically Bengali, I think my version of mujddara is quite similar to how we make pilau, minus all of the complicated spices. This dish only has cumin and black pepper but it surprisingly has a robust earthy and wholesome taste.


I adapted this recipe from This Muslim Girl Bakes and Arabic Zeal. From the latter, I took the idea of adding carrot which adds nice bites of sweetness to the rice. From the former, I got the idea of adding butter to the dish. The reasoning behind this was that apparently butter makes everything taste better, and my giddy aunt, the butter makes such a huge difference to an otherwise humble dish. I usually use ghee when I make traditional pilaus, however after the success of this dish, I may just switch to using butter now!

As I was writing out the recipe and instructions, I think I might have ended up making this sound more complicated than it really is. If you omit the caramelised onions, it is just an easy one pot dish. Measuring the rice and water using a coffee cup pretty much guarantees stress free perfectly cooked rice. In typical lazy Red Lychee fashion, I used canned green lentils, which cut down cooking time greatly. One day I might get around to soaking and boiling dried legumes, but today is not that day my friends!


Wednesday, 17 June 2015

Mango Kulfi


Greetings, dear readers! I'm back today with what will be my last post before we enter Ramadan on Thursday, in sha Allah. It's going to be a very different experience for me this year, as it's the first time that I'll observing Ramadan whilst working full time. In previous years, I have usually been on summer holidays, which has meant that even though the weather has been quite hot, it was mostly a calm and reflective time for me. Nothing at all like running after children and talking all day long! I only hope and pray that it will be something that increases me in patience and willpower. May we all be able to benefit from this Ramadan, ameen!

As Ramadan has been in the warmer months for the last few years, our eating habits when we break our fasts for the iftar meal has changed. People from the Indian sub-continent especially are notorious for having lavish feasts with very rich (and often deep fried!) foods. However, myself and my family have been trying harder to stay away from indulging too much in heavy foods during Ramadan as it's obviously not the best thing health wise, and also because such types of food are often the last thing you want to eat in the summertime. I have increasingly been enjoying consuming less hot food (both in temperature and spice!) that is lighter on the stomach after a long day of fasting. Last year especially, we often had something cold on the table, like this watermelon granita, or ice cream to cool us off.


As such, I've brought for your this version of a traditional desi mango kulfi which is quick and easy to make and involves no churning! I only tried kulfi a few years ago actually, as I think it is more popular in India and Pakistan than Bangladesh. A quick google search will reveal that kulfi is not just the Indian version of ice cream. Though creamy, it has a slight icy texture. And most importantly, it has a very ditinctive taste from the addition of pistachios. Kulfi comes in different flavours such as plain pistachio, or malai, however I went for mango as we are smack bang in the middle of mango season at the moment.

I have made this kulfi twice now, both times using tinned mangoes rather than fresh mango. I chose tinned mango mainly because it is just more convenient and also because tinned mango is pretty much always guaranteed to be sweet. Using kesar tinned mango pulp gave a much more vibrant colour to the kulfi. When I used another tinned mango brand, I had to mash the mango using a fork before I could add it to the mix.


Thursday, 11 June 2015

Spicy Wings


Very often when I get home from work, I will feel super peckish. I'll be walking up to the front door and all I'll be doing is thinking about getting home in launching myself face first into some potato-y, cheesy goodness. I blame our strange hours as a teacher. We have lunch at half 11 in the morning(!!) so by the time I get home, I'm feeling ravenous. Sometimes, as I raid the kitchen drawers, I can be pretty good and stay away from the carbs. And sometimes I know exactly what I want to eat, but it takes too long to prepare it, so I don't bother. These wings, come happily between not being too carb heavy and being quick and easy to prepare.

As it's from Aafiyah's frozen range, you can just take them out of the freezer and shove them into the oven, without waiting for them to defrost, and are cooked in about 20-30 minutes. They make a great Friday evening, post-work appetizer or snack, as my family and I enjoyed them, or can form a part of bigger dinner with sides. I served these wings with chopped cucumber and carrots (hello, vitamins) and topped the wings with toasted sesame seeds for a little crunch. 


The wings from Aafiyah come ready prepared with either a spicy or BBQ flavoured sauce, but I decided to come up with my own sweet and spicy sauce to drench the wings in just to add some more moisture.


Mutton and Yellow Split Peas Curry (Beri di chana dal)


I loooove legumes. I could quite happily live off lentils and chickpeas and not miss meat. Well not too much anyways. But combining meat and legumes together is a pretty winning combination in my eyes. This mutton and yellow split curry is one of my absolutely favourite meat curries. I had to do some research to find out what yellow split peas are called in Bengali or other South Asian languages. We call yellow split peas chana dal, however it turns out that's incorrect as chana dal is quite literally dried, split chickpeas. Yellow split peas are apparently called matar dal. And who said food blogging wasn't educational, ehhh??


I actually used dried yellow split peas rather than relying on tinned lentils as I normally do. But it's only because I haven't found tinned yellow split peas in the supermarket yet. If I do, I would totally switch over. I like this curry best the next day after the sauce has dried up and thickened a little bit and the spices have had time to mature a little bit. That's also my favourite way to enjoy any dal curry, actually, is that weird? I decided to pair the curry with the homemade, yeast free naan that I've already blogged about a couple of weeks ago which is perfect to mop up all of the juices. It tastes just as good however with plain rice, which is the usual way us Bangladeshis eat it.


Mutton and Yellow Split Peas Curry

Serves 6-10

Prep time: 30-40 minutes (plus overnight soaking of yellow split peas)

Cooking Time: 1 hour - 1 hour 30 minutes

by Abida at The Red Lychee


Ingredients:

1/2 cup yellow split peas
1 kg of mutton diced into chunks
5 tablespoons vegetable oil
One and half medium onions
4 cloves of garlic, minced/grated
1 inch piece of ginger, minced/grated
2 bay leaves
1 cinnamon stick/cassia bark snapped into pieces
3 cardamoms
1/2 tsp Salt
1/4 tsp turmeric
1-1 1/2 tsp chilli powder
1 tsp curry powder
1/2 tsp cumin
Handful of Coriander
Salt to season
Water


Method:


1) Wash and then leave yellow split peas in a bowl of cold water to soak overnight. The next day, rinse yellow split peas, and then place in a pot with cold water. Cook on a mdium to high heat for about 30 minutes, until the peas have softened in the middle. Skim off the froth from the top of the pot every now and then. Once peas are cooked, drain and reserve to the side.

2) In a large pot, add oil. Allow to heat up, then add garlic. Allow garlic to turn golden then add garlic, onion, cardamom, bay leaf and cinnamon. Add salt and stir. Then add the meat and the turmeric. Cover and leave to simmer on a medium to high heat. Check every 3-5 minutes. If the meat is catching the pan, add a little bit of water.

3) After about 20 minutes, once the onions have softened to a much and the meat has shrunk in size, add the remaining ground spices. Cover again and leave to simmer on a medium heat so the spices cook out. Check every now and then, and add water 1/2 a cup at a time if the meat seems like it is burning.

3) After another 15-20 minutes, once the oil and sauce have separated,  add the split peas and coat in the sauce. Leave to cook for about 10 minutes, and then pour in enough water to cover the meat and peas. For me, that is usually about a cup and a half of water (I use a normal coffee mug). Turn up the heat to medium-high and allow the curry to simmer to a boil.

4) Once yellow split peas have softened, and the meat is tender to your liking, season with salt to your taste. Add coriander and remove from heat. Serve with plain rice or flat bread.

Wednesday, 10 June 2015

Chicken Pilau


Many moons ago, when I was undertaking a work experience placement, someone asked me what the Bengali version of a Sunday Roast was. I jokingly replied we had Curry Sundays instead. Any family gatherings or inivtations we have usually fall on a Sunday, and usually there is some sort of pilau or biryani dish served as the star of the meal. Now I'll be honest, before making this chicken pilau, I had never really been trusted enough to make a pilau dish for company. But I feel as though I've made great strides in my cooking over the past year, and a few Sundays ago, I decided enough was enough and that I needed to conquer my fear of the pilau.

Now pilau, or pulao or pilaf, or fulaab as we Sylheti Bengalis call it, is a lot easier to make in my opinions than Biryani. You just combine the rice with the masala and add the water. The tricky part is making sure the grains of rice are nice and separate and don't become too mushy. That was the one thing I never used to quite get when I would watch my mum making pilau as she never used to measure anything and would rely on the dreaded 'antaaz' where everything was done by eye or feel. As a result, I never really knew how much water to add in proportion to the rice. However, to stay on the safe side, I followed a ration of 1 cup of rice to roughly 2 cups of water. You can scale back a little with the water as the rice cooks from the steam too.


If you are a lover of Indian food, but can't take the heat too well, this is a great recipe for you. It's sweet and aromatic and packed with lots of flavour. Alongside the chicken, you get butteriness from the ghee and sweetness from the addition of peas. The additional topping of nuts and sultanas also adds some sweetness and little crunch. I used no ground spices in this recipe, instead relying only on whole spices. The chicken masala/curry is cooks separately in about 45 minutes and what's really convenient is that you can make it the night before and make the actual pilau on the day in under an hour to serve fresh and hot.

Though chicken pilau is a favourite in our family, I can't say this version here with all of it's sweet notes is very authentically Bengali. I was trying to figure out if it is North Indian style or Mughal style or even Afghan style, but I'm not really too familair with the different asian cusines to definitively say one or the other. If there is an expert lurking on this page who can help me, then let me know! However, geography aside, it's a very tasty dish that is great for dinner parties and surprisingly straight forward to make.


As I mentioned a while back in my Afghan Kabuli post, the addition of dried fruit with rice can be contentious at times! I used golden sultanas this time around, and me and my family all really enjoyed the contrasting sweetness. I also added some toasted cashew and almonds for some texture. If you have some dried fruit and nut phobics in your families, then feel free to omit it or perhaps serve on the side as an optional topping.


Saturday, 6 June 2015

Lemon Curd


We've been having some glorious weather recently. The skies have been bright and the sun has been shining with full force. It really does put a bit of a zing in your step. Of course, on the flip side, good weather always seems to bring out the worst in drivers in London. Maybe it's because they're in a rush to enjoy the sun whilst it lasts, but they can be crazy at times. And don't even get me started on using public transport in London during the summer. It's an arduous and sometimes traumatizing experience...

Nonetheless, as I've mentioned many times, the sun always puts me in a good mood. And maybe it's an unconscious thing, but the food I eat seems to become more colourful in the warmer months. This homemade lemon curd is pretty much sunshine in a jar. I was oohing and aahing like a child at its colour as I was making it. 

I may not have the worlds biggest sweet tooth, but I love citrus flavoured desserts. I love the freshness and the slightly sharp note that cuts through the sweetness. This lemon curd is bold and vibrant, perfect for the warm weather. It tastes great on toast, on cheesecakes or with meringue. My personal favorite way is to top Greek yoghurt with it and top it with some almonds and golden sultanas. It's a very quick and easy dessert that doesn't come with too much guilt at the number of calories it contains!


I used the popular recipe from BBC Good Food to make this lemon curd. I was put off it at first because the mention of using a double boiler method just seemed like too much effort to me (I've lost count of how many times I've mentioned on this blog what a lazy cook I am). However, it can all be made within an hour and it requires very little equipment, so minimal washing up. Win.

The only thing I found difficult was sterilising the jars. I had these cute kilner jars that I wanted to use. I thought it would be fine to just wash the jars out with boiling soapy water and then leave them to air dry. However, as soon as I poured the water straight from the kettle into the glass jar, the bottom of the jar just clean split away. I was pretty sad that I had wrecked the jar with a silly rookie mistake. Then I found an old honey jar and second time round made sure to wash it out with hot (but not boiling hot!) soapy water. I then put the jar in the oven at a cool temperature, probably about 140C to dry out.

The only other thing I would mention about this recipe is that you need to make sure that you adjust it to your liking. The Good Food recipe uses the juice of 4 lemons. I squeezed them out pretty hard, and as a result, the taste was very sharp. If you would prefer something a little less tart, then I would recommend either using 3 lemons, or squeezing 4 lemons lightly. This recipe yields quite a lot of lemon curd, about 500g. I was able to fill a 340g jar fully, and still had about 150g-200g left. I would also say that it will keep for about 1-2 weeks in the fridge, and longer if your freeze it.

Friday, 5 June 2015

Chicken and Sausage Bake


I have another 'shove-it-in-the-oven' savoury recipe today. It's a totally lazy, minimal thought recipe suitable for even the most culinary handicapped. It was inspired by a recipe from Nigella for Spanish chicken, where she baked chicken with chorizo and flavoured it with orange zest. I have yet to find halal chorizo sausage and so used some Merguez sausage from the other side of the Mediterranean, and which I've already talked about in my North African style breakfast hash post

I've kept the flavourings pretty simple here, but all the juices that come out from the chicken and merguez create a delicious sauce. I used chicken thighs from Aafiyah's frozen range, which already had a garlic and herb coating. Like Nigella, I added some chopped baby potatoes which roasted away with the meat. After the potatoes are done, they become lovely and crisp on the outside but fluffy on the inside, just the way potatoes should always be. I also added some chunks of red onion, which caramelise in the oven to give a sweet contrast. 


The great thing about this dish is that you can just modify it to suit whatever you have in your pantry. Sweet potato would make a great alternative to baby potatoes, and you could add other produce like tomatoes or carrots. It's a convenient dish for busy families when you don't have the time or energy to labour over dinner. I served the dish with a simple side salad. You could also add some other veg for extra health benefits or some nice pita bread.

Tuesday, 2 June 2015

Tandoori Chicken and Homemade Naan


How time does fly! It feels as though I just blogged my last recipe the other day. But it's been a rather jam packed few weeks. The last week of May especially in my mind now is just a manic blur of work, deadlines and other commitments. The 1 week break from school came as a much needed respite, and though my lack of posting boiled down to technological restraints, being "unplugged" for a few days felt quite refreshing. I sometimes get the urge to just throw away all pieces of technology and just live under a rock on a farm, but to be honest, I think I'm too much of a city girl slash technophile to ever really survive such a lifestyle. I suppose the key is finding the right balance, but that's the secret to pretty much everything in life, right?

The teacher side of me has the end of the academic year firmly in her sights, but sadly my brain is so fried at this point, that it's more like I'm dragging myself to the finishing line rather than a final sprint. Hashtag The Glamorous Life of a Teacher. However, I am currently super excited for the arrival of Ramadhan, my favourite time of the year. As for many people, it's a time of moral and spiritual renewal for me and to be able to take a step back and realise, amongst all the stress and the mayhem, what the bigger picture really is. It's also around this time of year that many start searching for and planning what meals to prepare to eat after breaking their fasts. So I thought I'd post some slightly more traditional yet surprisingly easy recipes.


The first recipe is a quick tandoori chicken recipe, using drumsticks from Aafiyah's frozen range, minus the tandoor or packaged tandoori spice masala. Like my sumac chicken, it's another great example of just leaving things to marinade for a while and then shove it into the oven. Exactly the kind of recipes you want for Ramadhan, when you do not want to be stuck in the kitchen all day. And as it's baked, it's a lot lighter than other heavier Indian dishes. 

Homemade naan makes a great accompaniment to the chicken. I have been wanting to try out so called instant naan recipes for a while now, however I always got put off thinking that it was too time consuming. But surprisingly it was a lot quicker and easier than I expected. There is no yeast used in the recipe, with all the rising power coming from the yoghurt, and baking powder/soda combo. 

 The dough is very elastic and malleable meaning that it's easy to roll out. As I was making them, I was far too impressed by how much the little circles of dough puffed up on the pan like pillows. It was quite the metamorphosis. The recipe I followed suggested smearing the naan with ghee to add a buttery taste, however, all of my family members agreed that it tasted better without. I also decided to add some black seeds to add a little contrasting spice to the naan. Whilst I was rolling out the naan, I sprinkled a handful of black seeds on top of each circle. I don't own a tawa at home so I just used a regular frying pan and the results turned out just fine. To try your hand at some instant naan, check out Kanakana's detailed instructions here. To find out how I made my tandoori style chicken, read on!